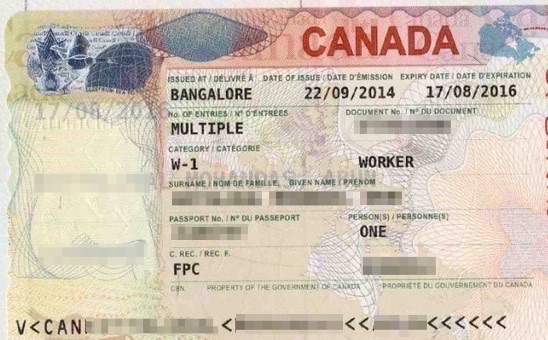
Applying for a Canadian visa is often the first step for many travelers, students, or workers planning to visit Canada. Understanding what a Canadian visa looks like and the essential details it includes can make your journey smoother and give you a better sense of the process. In this article, we’ll walk you through the appearance, key features, and security aspects of a Canadian visa. This guide is crafted in simple terms to make the process easier for everyone to understand.
What is a Canadian Visa?
A Canadian visa is an official document issued by the Government of Canada, which allows foreign nationals to enter, stay, or transit through Canada for a specific period. It comes in various types, such as visitor visas (temporary resident visas), student visas, work permits, and permanent resident visas. Each visa type is tailored to the purpose of the visit, whether it is for tourism, study, work, or immigration.
Where is the Canadian Visa Placed?
A Canadian visa is generally a physical sticker that is placed inside your passport by a Canadian embassy or consulate. When you receive your passport back after the visa approval process, you will find the visa affixed on one of its pages. It is important to keep this page intact, as it will be checked by immigration officers when you enter Canada.
Also read How to write a cover letter for Canadian Tourist Visa?
Key Features of a Canadian Visa
Understanding what a Canadian visa looks like and the information it contains is essential for any traveler. Here’s a breakdown of the main components you’ll find on a Canadian visa:
1. Visa Category and Type
- The top part of the visa typically mentions the visa type, such as “Temporary Resident Visa” or “Student Visa.” This indicates the purpose of your stay in Canada.
- The visa category will align with the purpose of your trip, helping Canadian authorities understand whether you are visiting as a tourist, student, or worker.
2. Personal Information
- The visa includes key details about you, such as:
- Your full name.
- Your date of birth.
- Your nationality.
- Your passport number.
- Make sure this information matches the details in your passport to avoid issues at immigration.
3. Dates of Validity
- The Canadian visa clearly states the date when it becomes valid and the date it expires. This period indicates how long you are allowed to enter or stay in Canada.
- The dates are written in the format of year-month-day (e.g., 2024-03-01). Ensure you plan your travel according to these dates to avoid overstaying.
4. Number of Entries
- Another important feature on the visa is the “number of entries” field. It indicates whether you have a single-entry visa or a multiple-entry visa.
- Single-Entry Visa: Allows you to enter Canada once. After you leave, you cannot re-enter without applying for a new visa.
- Multiple-Entry Visa: Allows you to enter and exit Canada multiple times within the validity period. It is convenient if you plan to travel back and forth between Canada and other countries.
Also read How to apply for study permit extension from inside Canada?
5. Unique Visa Number
- Each Canadian visa has a unique Visa Reference Number located at the top right corner of the visa sticker. This number is used to track your visa application and for official references by Canadian authorities.
- Keep a copy of this number in case you need to contact Canadian immigration services or the embassy regarding your visa.

How to Identify a Genuine Canadian Visa?
Given the importance of a Canadian visa, it is really important to make sure that the visa you receive is genuine. Canadian visas come with several security features to prevent forgery. Here’s what to look for:
- Holograms: Canadian visas include holographic elements that reflect light in specific ways, making it difficult to duplicate.
- Embossed Seal: The visa may have an embossed seal that can be felt with your finger. This adds another layer of security.
- Microprinting: Some sections of the visa may include microprinting, which is text that is only readable under magnification. This feature is used to verify authenticity.
These features make sure that Canadian visas remain secure and legitimate. If you ever have doubts about the authenticity of your visa, you can reach out to the Canadian embassy or consulate where you applied.
Also read How to Write a Cover Letter for Your Canadian Study Visa?
What to Do After Receiving Your Canadian Visa?
After receiving your Canadian visa, it is important to double-check all the information printed on it. Make sure that your personal details are accurate and that the validity period aligns with your travel plans. Also, make sure to keep a photocopy of your visa and store it separately from your passport in case it gets lost or damaged. Being aware of the details of your Canadian visa can help you avoid any surprises when you arrive at the border, ensuring a smooth and hassle-free entry into Canada.
Knowing what a Canadian visa looks like and what each section represents can significantly ease the travel process. It allows you to be prepared and ensures a smoother transition during your trip. Make sure you adhere to the guidelines, respect the visa’s validity, and enjoy your time in Canada!

